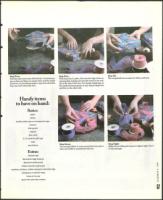
Step Four
Fold the sides and crease folds firmly. Cut excess pa-
per so that end flaps are longer than half the depth
of the box. It sometimes helps to tape down the first
flap (one with back fold) first.
Step Five
With that flap in place, fold over the edge of the re-
maining flap making sure the fold comes to the mid-
dle of the side of the box. Use double-sided tape on
the inside and press gently to seal. Repeat Steps four
and five on the other side.
Step Six
The completed box is ready for ribbon and bow.
Step Seven
Use enough ribbon to wrap around the box; pick a
color and width to complement the box.
Step Eight
Make a bow folding the loops in a figure eight. Tie it
on the package.
Handy items
to have on hand:
Basics:
paper
ribbon
double-sided tape or transparent tape
scissors
hole punch
stapler
glue stick
3 x 5 cards for gift tags
ruler
pencil/pens
Extras:
colored tape
decorative-edge scissors
decorative hole punch
rubber cement or glue gun
markers, stickers, rubber stamps to decorate tags
cellophane or shrink wrap
trims or tie-ons
spool wire and wire cutters