caide
It's A Wra !
Chanukahgifts will shine as brightly
as the candles with these simple tips.
LISA GLEESON SPECIAL TO THE JEWISH NEWS
PHOTOS BY GLENN TRIEST
IIhe anticipation of opening a
lovely box is part of the fun
in receiving a gift.
With thought, care and a lit-
tle imagination, you can make
the outside of your gift as special as the
contents.
Pick a theme that complements the gift
and carry it through with paper and rib-
bon. Consider using unusual containers
— baskets or bags — if you have a dif-
Lisa Gleeson is the owner of Lisa's Gift
Wrappers Co. in Tray. She is a fiber
artist and teaches local classes.
ferent shape to wrap.
Proportions are important; use a small
print on a small box, large on a large one.
This holds true for ribbon choice also; nar-
row widths work better on smaller pack-
ages. Bows can be pre-made or hand-tied.
Experiment by combining different tex-
tures, thick and thin widths of ribbon,
multiple or blended colors. Other mate-
rials like raffia, garland or fabric can give
varied looks.
Decorations or tie-ons can be used for
additional creative touches. They work
best if they follow the theme or comple-
ment the paper.
Cr)
LLI
Ci)
LLJ
C)
CC
L11
LLJ
GO
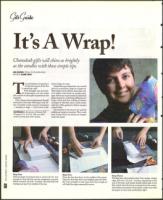
Step One
Choose paper and place box in center of roll. Cut
enough so that the box can be completely covered.
Allow an extra 1/2 inch - 2 inches. The first fold will
overlap just past the middle of the box.
Step Two
Place the box face down in the middle of the paper.
Tape the first flap down just slightly past the mid-
dle. Use invisible or clear tape and only enough as
will hold the edge reasonably secure.
Step Three
The flap that will overlap is next. For a neater, crisper
edge, fold over (1/2 inch - 2 inches, depending on the
size of the box) and attach double-sided tape to the
fold, which should end up running down the center.
Just before you press it into place, make sure that
the paper is even and comfortably tight.